Home » Home Improvement
Category Archives: Home Improvement
How to Do Window Installation Correctly
To ensure the window seals properly and operates smoothly, spray a thin layer of minimally expanding foam into the sash-weight pockets in the side jambs. It also fills any gaps less than 1/4 inch wide with elastomeric caulk.
It’s important to keep children and pets away from the work area during Window Installation Waukesha to prevent accidents. This step is also an opportunity to cover furniture in the room that may be exposed to dust and debris.
1. Clear the Area
Window installation is a project that requires ample space to do it correctly. It can cause dust and debris to spread throughout the house, so it’s important to clear the area. You’ll want to move any furniture away from the windows, and consider taking down wall art or other decorations.
Window tracks and sills can get packed on with grit, making them difficult to clean. Use a vacuum cleaner attachment with a crevice tool to remove any loose dirt. For caked on dirt, make a paste of water and a mineral deposit removing cleaner with oxalic acid (such as CLR or Zud). Apply the paste to the area and rub it in gently.
Installers will use a slow-expanding spray foam fill to add insulation around the window opening. This will double insulate the area and prevent moisture infiltration.
2. Measure the Window
Before ordering any new windows, you’ll need to measure your existing window frame. This will give you a baseline measurement that you can use to find windows that will fit. You should also subtract a small amount from both the height and width measurements to account for shimming and insulation.
To find the width, extend your tape measure horizontally across the frame in three places. Take the smallest measurement as your window width.
For the height, extend your tape measure from the head jamb (the top vertical piece of trim) to the sill. Measure in the left, middle and right corners of the frame and choose the shortest measurement as your window opening height.
3. Remove the Old Windows
You’ve probably heard the adage “measure twice, cut once”. This same principle applies to window installation. Correct measurements ensure that the new windows fit properly, reduces potential energy loss, and minimizes moisture infiltration.
Skilled installers will carefully remove the old windows, preserving materials that can be reused. They will also inspect the exterior stop moulding, if applicable, to ensure it is intact and not damaged.
The old windows are removed section by section, so the new ones can be put in right away. This helps keep the crew on schedule and ensures that your house will always have a working window in place. This will increase your home’s security and help you save money on your energy bills. It will also improve your home’s comfort and curb appeal.
4. Measure the New Window
It’s critical to accurately measure the size of the new window. A tiny mistake can throw off the entire installation and leave you with ill-fitting replacement windows.
To determine the window height, make three vertical measurements. First, from the sill to the head jamb on the left side, then in the center and finally on the right. Take the smallest of these numbers and use it as your window opening height.
Repeat this process to get the width and depth of the frame. Be sure to include the trim when taking these measurements. Some installers will also need to add casing or brickmould, which wraps around the exterior of the window to provide a finished look. This can increase the cost of the project, so it’s best to discuss this with your installer before starting. Whenever possible, have two people take the measurements so that they can compare them and record them at the same time.
5. Cut the Frame
Incorrect framing can lead to water infiltration, poor window operation and alignment, and energy loss. Framing carefully and double-checking measurements is important for a successful window installation.
It’s best to frame the window opening before installing drywall to prevent damage and ensure a tight, strong fit. Be sure to use rot-resistant materials, such as OSB or plywood.
The sill of a new window can be sloped by cutting the top of the cripple studs at an angle. This allows you to reduce the height of the sill without compromising load requirements or weakening the header. However, it is important to note that this will reduce insulation space. Be sure to consult a professional when making this adjustment.
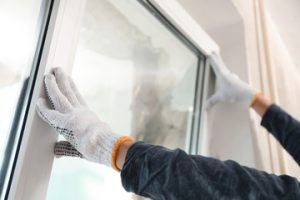
6. Install the Window
Once the new window is positioned in the opening, installers use shims to keep it level and plumb. This is an important step because improperly installed windows can lead to leaks and energy loss.
Then, a bead of caulk is applied around the window frame to create an airtight seal. If needed, foam insulation can be added to the exterior stop molding (also known as blind stop) for an additional seal.
Canvas runners and tarps are set up throughout your home to protect your furniture, and children and pets are kept away from the work area for safety. This also helps the crew avoid unnecessary distractions while working on your windows. This is a great way to ensure a seamless installation process.
7. Apply the Caulk
Applying caulk around your window provides a finishing touch to the installation and creates a seal against air and water. Properly applied caulk also protects your home from energy loss.
Before applying the caulk, thoroughly clean the area around the window. Scrape off old caulk with a putty knife and remove any loose or damaged areas. Dampen the area lightly with a sponge or cloth, and allow it to dry completely.
Choose a caulk suitable for the application and climate conditions. Exterior caulking must be able to withstand weather changes, while interior-side windows require a mold-resistant caulk. Using a utility knife, cut the applicator tip on the caulk tube at a 45 degree angle. This allows for better precision when applying the caulk. Start at one corner and apply a bead of caulk along the seam, working from corner to corner.
8. Install the Hardware
Once the window is in place, the installers will install the hardware. This includes the handle, locks, and latches. It’s important that the handles are properly installed to ensure a smooth, bind-free operation. The installers will also inspect the frame and sill for dents, scratches, or any other damage.
In addition, they will make sure that the new window is positioned correctly in the opening. This step is very important because it helps prevent thermal transfer and energy loss.
It is recommended that you remove any curtains or window treatments from the windows during this time. This will allow the installers to work more easily and quickly. It’s also a good idea to move any furniture away from the area to protect it from dust or debris. This may seem obvious, but it’s very important! This is especially true if you have small children or pets.
9. Install the Weather Seal
It’s always a good idea to follow the old adage “measure twice, cut once.” This is especially important if you’re having new windows installed, which are usually built into an existing frame and are incorporated into the house’s existing weather barrier.
New window installation is typically done during the construction of a new home or as part of significant renovation or addition project. It may involve modifying an existing opening in the wall, installing support framing and interior trim casing, flashing the window, and caulking.
Installers use a slow-expanding spray foam fill to seal the gaps around the frame and sill. This double-insulates the window and provides a watertight seal to prevent air and moisture leakage. Vinyl V strips are often used in this application. They’re inexpensive, easy to work with, and nearly invisible when installed properly.
10. Clean the Window
Once the window is in place, it needs to be cleaned to remove any residue from the caulk. The installers will use a sponge or a clean, dry cloth to wipe the window surface. Paper towels should be avoided, as they leave lint films on the windows.
They will also apply a second coat of caulk to the outside of the new window frame to seal it against moisture infiltration and cold air infiltration. This is a critical step, and using the highest-quality caulk that resists shrinking in the elements will ensure a long-lasting finish. A good caulk will also help minimize energy bills and make your home more comfortable.
How to Maintain Epoxy Flooring
Surface Pros Epoxy Flooring is popular among homeowners due to its ease of maintenance. This type of flooring is durable and gives any space a modern showroom-quality look.
It creates an impenetrable, non-porous seal, which makes it water-resistant. It is also great for areas that will experience oil or chemical spills.
One of the biggest benefits of epoxy flooring is that it’s waterproof. It’s a great option for spaces that are regularly exposed to moisture or spilled liquids such as warehouses, garages and commercial kitchens. It also works well in industrial settings that may have to deal with chemicals and other substances that can cause damage to concrete floors.
Waterproof epoxy floors are a smart investment for any space. They can last for a long time and they are very easy to maintain. They are also extremely durable and look beautiful. They can be customized with different colors, patterns and swirls to make them more appealing and fit a particular décor or design theme.
While it’s important to remember that epoxy is only waterproof once it has cured, the fact that it can withstand the elements makes it a reliable choice for areas of a building where it’s likely to get wet. It’s best to consult with an expert contractor who can recommend an epoxy mix that’s designed for the type and amount of chemical exposure in the space. Tailored epoxy blends can safeguard the surface of your floor and the underlying structure from corrosive chemicals.
One thing to keep in mind is that epoxy can still be slippery when it’s wet. For this reason, it’s recommended to add grit to any Leggari epoxy coating to increase friction and prevent slip and fall accidents. This is a common addition to commercial spaces and can be done for a very affordable price. It’s a good idea to talk to your Leggari flooring specialist about adding this safety feature to your new floors. They can easily add it for you at the time of installation and provide a quote.
Chemical Resistant
Epoxy is a highly chemical-resistant material, which makes it an excellent choice for commercial medical and food settings that require sterile surfaces. It is non-porous, so dirt and bacteria cannot hide in cracks and crevices. This helps reduce long-term cleaning and maintenance costs by reducing the need for extensive products and procedures. Epoxy floors are also highly durable, which can withstand the impact of heavy machinery and equipment.
Various resin types offer different levels of chemical resistance. Some are resistant to aqueous acids and alkalis, fats, general fuel and lubricants, salt and sugar solutions, and aromatic and aliphatic solvents. Others are more sensitive to temperature and may disintegrate at higher temperatures.
The chemical resistance of epoxy floor coatings is determined by their crosslinking density and reactivity of functional groups. High-quality chemical resistant epoxy floor coatings have a higher crosslinking density and lower reactivity, making them more durable and able to withstand a wider range of chemicals.
To maximize the durability and chemical resistance of an epoxy floor, it is important to prepare the surface properly. This can be done by removing any furniture or other items that could get in the way of installing the coating, and using either mechanical grinding or chemical etching to clean the concrete. After the surface has been prepared, it is important to allow a sufficient cure time.
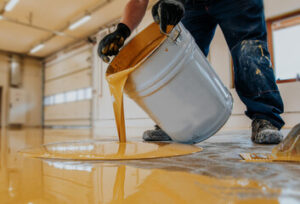
Once the floor is ready, it is easy to apply the first coat of epoxy. Then, once it has cured to the manufacturer’s specifications, you can install the top coat. Be sure to use a roller to avoid noticeable seams in the finished product. It is also recommended that you wear a respirator and safety goggles during the application process to protect yourself from fumes and dust. Sturdy boots and shoe covers can also help to protect your feet from any accidental splashes of the liquid epoxy.
Durable
Epoxy creates an impenetrable, non-porous seal that is water-resistant. As such, it can be used in areas that are susceptible to flooding or water damage from spillage. This durability is particularly useful in commercial spaces that may have to deal with toxins such as oil or chemical spills. The epoxy will not be affected by these toxins and can be easily cleaned afterward.
Additionally, epoxy is a very strong material that can withstand heavy loads without cracking or tearing. As a result, it is an ideal floor covering for industrial environments where heavy machinery and vehicles are commonplace. The sheen of an epoxy flooring can also be a good way to enhance lighting in large facilities, which can help with visibility and safety.
Proper maintenance practices play a key role in determining the lifespan of an epoxy floor coating. A routine that includes regularly sweeping, vacuuming, and scheduled maintenance tasks such as recoating will help to keep your floor looking newer for longer. Floors that are neglected or subjected to harsh chemicals will have a much shorter lifespan.
The type of environment in which the flooring is being installed will also play a role in its longevity. For instance, a factory floor that is constantly subjected to heavy machinery and loads will have a different lifespan than a showroom with relatively light foot traffic. The substrate surface must also be carefully prepared before applying an epoxy coating, which can be achieved through mechanical grinding or chemical etching. The proper preparation of the substrate will ensure that the epoxy adheres well and will not crack or peel over time. For the best results, the concrete should be completely dry before applying the epoxy flooring.
Easy to Clean
When it comes to keeping an epoxy floor clean, the process is quick and easy. Regular sweeping or vacuuming is necessary to remove any dust and debris that may accumulate on the surface. Epoxy floors are also very water resistant, which means any liquid spills can easily be wiped up and the floor will remain dry. This is a great feature for areas like garages and showrooms that may experience oil or chemical spillage, as these toxic substances will not soak into the floor and create a potential health risk.
If any stains or marks are present on an epoxy floor, a soft brush, pad, or kitchen sponge can be used to gently scrub them away with warm water and a cleaning solution specially formulated for epoxy floors. It is important to avoid using steel wool or harsh scrubbing as this can damage the epoxy coating and cause scratches on the floor. If the stain is particularly stubborn, a degreasing cleaner can be used to penetrate the oil and break it down.
For a more thorough cleaning, a micro fibre mop can be used to ensure a deep clean. This is especially recommended if the floor has a clear finish as it will leave no streaks or smears. Be sure to read the labels on any cleaning products before use as some solutions, such as citrus or vinegar, can strip the epoxy coating of its glossy shine.
Epoxy is one of the best flooring options for businesses and homes, but it needs to be properly maintained in order to last. By following the tips above and regularly sweeping or vacuuming your floors, you will be able to keep your epoxy flooring looking its best for years to come.
Easy to Maintain
Aside from being able to withstand a great deal of traffic and abuse, epoxy flooring is also easy to keep clean. Because of the non-porous nature of epoxy, dirt, dust, and other chemicals will not absorb into the floor coating. Keeping this in mind, it’s important to scrub the surface regularly — at least weekly — with the proper cleaning equipment. Scrubbing frequency will depend on the amount of soilage typically seen on your flooring, with high-traffic areas requiring daily attention. This can be done with a mop and bucket or, for greater productivity, a mechanized scrubber.
Using warm water and mild soap is the best way to keep an epoxy floor clean. Harsher cleaners can damage the sealant and cause a sticky residue that will not be easy to remove. A diluted ammonia solution is ideal for tough stains like oil, grease, and automotive chemicals.
Epoxy floors are also slip-resistant and provide more traction than slippery tile or linoleum surfaces. This makes them a popular choice for industrial environments, fire station bays, and commercial kitchens.
If you do not scrub your flooring regularly, it will begin to look worn and soiled over time. Even worse, the dirt will eventually scratch the epoxy coating, leaving dings and gouges that can compromise its integrity.
This is why it’s recommended that you have your floor coated by a professional rather than attempt a DIY install. Although the up-front cost of a professional floor will be more expensive, it’ll save you money in the long run by extending the life of your floor and making it easier to maintain. If you do decide to go the DIY route, make sure you have a knowledgeable installer guide you every step of the way.